I've been exploring ChiselStrike for quite a while and wanted to share my experience with it through this blog. Let's start with the basics!
What the hell is ChiselStrike?
ChiselStrike is a cutting-edge new framework that lets you build and deploy backend applications in no time. Unlike most of the "other" frameworks, one of the awesome things about it is that you can prototype and create production-ready applications simultaneously in no time.
It handles the DevOps for your without getting into complex cloud topologies, manages the database without worrying about things like building complex schemas, etc., and has things like scaling, security, and data compliance all built in. Don't worry, you can run your applications in the localhost as well while building them.
In my experience coding with it, what I loved about it the most is how I could follow the rapid application development framework using it. As developers and management teams, this is what we aim to follow, i.e., not getting into the costly planning of software, but quickly prototyping based on collected feedback to get a production-ready application ASAP!
Why should I choose ChiselStrike?
Why not? From being able to rapidly build production-ready prototypes for your application to not worrying or spending on additional resources for handing your DevOps, Database Management. To be able to run your applications at any scale on top of that, it's a complete package to build your backend APIs with.
It also works with TypeScript, which is another big plus! It supports integrations with a lot of frontend frameworks and Content Delivery Networks so that you don't have to exit your comfort zone.
Do you Love working with ReactJS, or is it NextJS? It could be AngularJS, VueJS, or GatsbyJS as well. It's got you covered! It has also recently received backing from Netlify, which has been huge!
The Developer Experience With ChiselStrike!
Developer Experience is absolutely essential for any tech-centered product. There's no doubt about it being the top-most priority to win the loyalty of the developer's community. After all, we can be "naggy" sometimes, right?
One thing I absolutely loved about ChiselStrike is that their team has been super responsive and helpful no matter what. It's like they're learning and improvising with us and they actually care a lot about the developer experience.
While I was developing my first application with it, truth be told, I was a little bit in uncharted waters. It's relatively a new framework, to begin with, and it's documentation still leaves you with some if(s) and but(s) and how(s) while developing a backend with it but they have some amazing examples of integrated applications with GatsbyJS and NextJS with proper GitHub documentation which you could easily refer to and understand what's really going on behind the scenes.
On top of that, you can always feel free to look up for issues (or add new ones) in their official GitHub repository or feel free to ask them directly on their Discord server. I can vouch for how helpful and active their team is!
Creating my first application with ChiselStrike
As software engineers, we understand that new frameworks and technologies keep coming up to solve existing problems to get you started ASAP, so I decided to get my hands dirty with ChiselStrike by building a quick URL Shortner using it (link).
Why did I choose this project? First off, it's relatively simple and a good first project to try out/learn a new framework, and secondly, ChiselStrike's co-founders thought that we should port a URL shortener to demonstrate a simple CRUD application built with it.
This application demonstrates how you can easily set up and create CRUD applications and backends with GET, POST and DELETE APIs. It also demonstrates how database models can be built quickly with ChiselStrike, managing the data compliance through the simple schemas and interacting with your database through your endpoints.
I personally used the Gatsby example as a point of reference and used GatsbyJS to build its frontend.
Note - We're using the good old localhost for this example, but the developers can choose to deploy to the platform itself by following simple CLI methods. I'd definitely cover a blog on that soon!
Setting Up The Frontend Project
Since I used GatsbyJS to create the front-end of the application, I referred to their official documentation to set up its development environment in my system.
All you need is NodeJS (v14.5 or newer) and NPM installed in your system, and you can install the Gatsby CLI through a simple command -
npm install -g gatsby-cli
Initialising Gatsby Frontend Application
While this example contains steps to initialize a frontend application using GatsbyJS, you could very well use any other frontend framework that you would like.
To initialize a new gatsby application after installing its CLI, simply navigate to where you want your project to be and run -
gatsby new
It will ask you a series of questions to set up your project template, including -
- What would you like to call your site?
- What would you like to name the folder where your site will be created?
- Will you be using JavaScript or TypeScript? (I selected JS)
- Will you be using CMS? (Select "No (or I'll add it later)"
- Would you like to install a styling system? (Select "No (or I'll add later)")
- Would you like to install additional features with other plugins?
After answering all these questions, it will quickly show you the summary of all the choices you made before setting up your project template. Quickly review if everything is right and proceed.
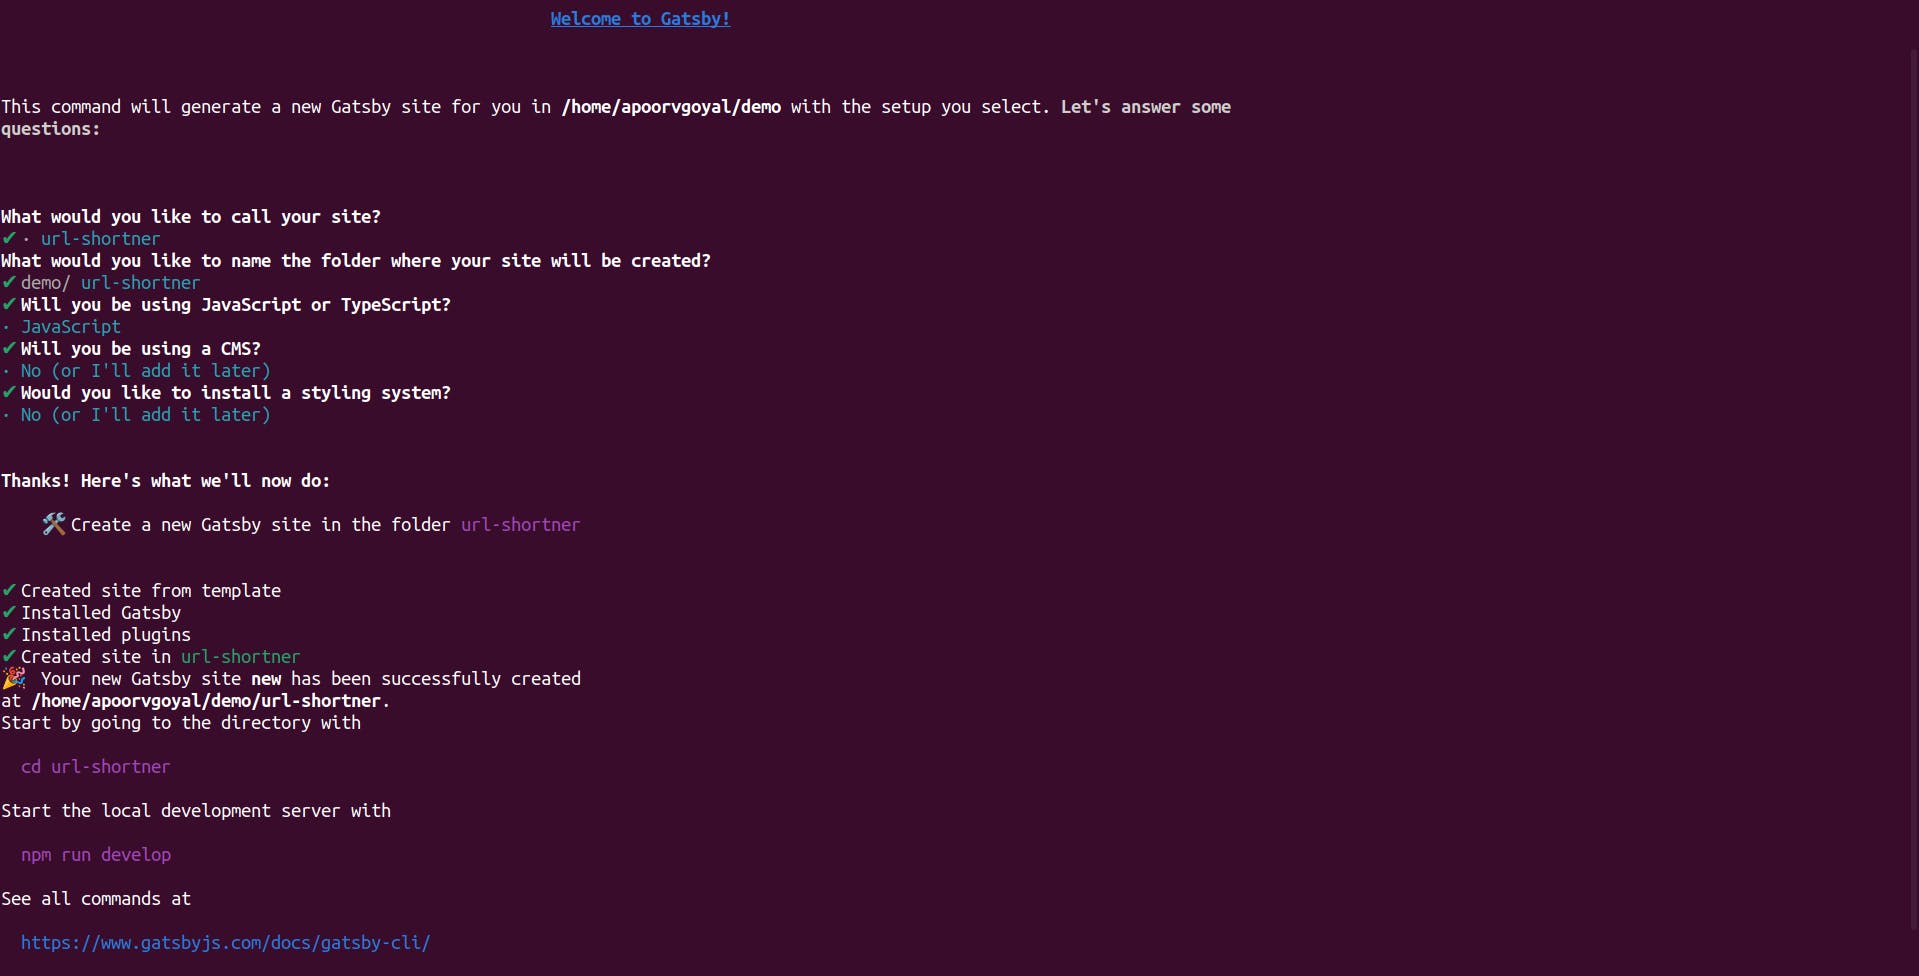
Now let's take a closer look at the Template that is created -
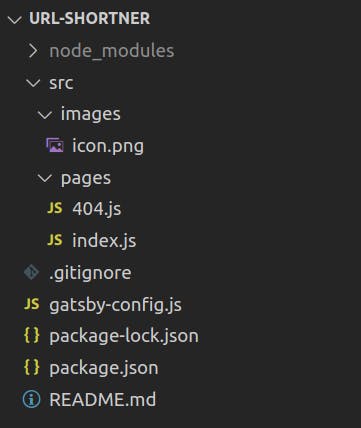
1. src/ - This contains the source code for our frontend project.
src/pages/ - Directory to host your frontend code for different endpoints. index.js directly maps to / endpoint, whereas any new file, such as testing.js would point towards /testing endpoint.
src/pages/index.js - File containing frontend code (written in ReactJS) for Home (or root endpoint) for your project.
src/pages/404.js - Default frontend page for any endpoints that are not found in the project.
2. gatsby-config.js - Contains sitewide configurations for your gatsby frontend project.
Setting up the backend project with ChiselStrike
We understand how ChiselStrike is easily integrated with frontend applications. All you have to do is that inside your frontend projects directory, run the following command -
npx create-chiselstrike-app backend
This command can also be used to create individual backend applications, however since I want to create the backend for my url-shortener, I run this command inside my frontend project's directory.
Once you run this command, it will first ask you to install the create-chiselstrike-app package if it's not installed, and then it will proceed to set up your backend application. Your project filesystem would now look something like this -
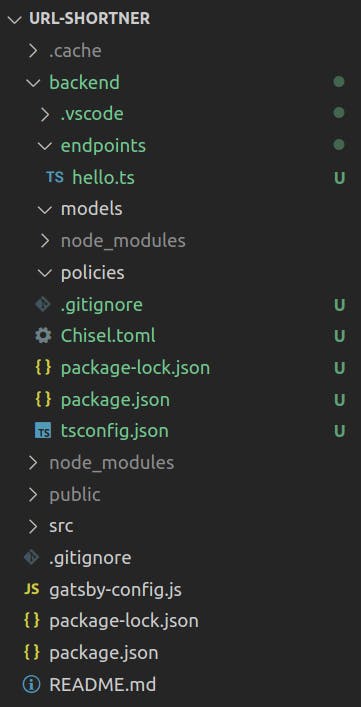
As you can now notice, a new backend directory has been added to the project with the following structure -
1. backend/endpoints - A directory containing your endpoints. The name of the file (hello.ts by default) reflects the endpoint with which it will open. APIs created in hello.ts can be accessed through the /hello endpoint.
2. backend/models - Your Database models go here, and it is easy to create. We'll go through that further in this blog.
3. backend/policies - If your project needs to follow a certain flow of access to data, policies would come in handy there. Although they aren't used in this project, I'll soon create an application that uses them.
4. backend/Chisel.toml - Tells ChiselStrike about the nature of the directories (directory models being used as models, endpoints being used for endpoints, etc.)
The project structure is pretty clean, and easily supports MVC architecture, which is widely used in backend development.
Now, let's start by creating our first model in the backend. For that, inside the backend/models/ directory, create a new file UrlSlug.ts and add the following code to it -
import { ChiselEntity } from "@chiselstrike/api"

export class UrlSlug extends ChiselEntity {
    createdAt: string = ""
    url: string = ""
    slug: string = ""
}
Here, we are simply importing ChiselEntity from ChiselStrike's API, and with it, we are creating a class UrlSlug with the following attributes -
1. createdAt - The date on which this slug is created.
2. url - The URL to which it needs to be redirected.
3. slug - The endpoint which will redirect to the URL.
Now, creating models is made simple with ChiselStrike. I've worked with both SQL as well as NoSQL databases, and this is as simple as it can be. All you have to do is define the fields, define their data types and there you have your models ready which would ensure that you don't have to deal with creating and managing a database (ChiselStrike does it for you) and you don't even have to worry about data compliance. ChiselStrike will keep that in check for you.
Once the model has been created, our next job is to actually create the APIs. For that, let's create a new file in backend/endpoints/ called url.ts. This means that the APIs within this file would be accessed through the /url endpoint.
Now we will build 4 APIs -
1. GET - To get all the url(s) added
2. POST - To add new url(s) to the database
3. DELETE - To delete an existing url from the database
Creating the APIs in ChiselStrike
Let's start by importing what we need for this. In backend/endpoints/url.ts we will -
import { UrlSlug } from "../models/UrlSlug"
UrlSlug is the model that we created, which we will use to interact with our database inside the API.
Now, since we have 3 different types of APIs to handle - GET, POST and DELETE in our case, let's create a handler -
type Handler = (req: Request, res: Response) => Response | Promise<Response>
A simple handler that will take the requests and return a response.
Now, let's start with the POST API -
const handlePost: Handler = async req => {
  const payload = await req.json()
  const created = UrlSlug.build({
    ...payload,
    createdAt: new Date().toISOString(),
  })
  await created.save()
  return "inserted " + created.id
}
In this API, we are expecting the request to have a JSON with the URL and a Slug, and we're taking up that payload and passing it to the build() method on our UrlSlug model. Remember how our model is extended from ChiselEntity. That provides us with all the necessary methods we need to perform operations in our model.
We can then call the save() method to our UrlSlug object to save it in the database and simply return the response with the ID of the database entry created. Simple, right?
Similarly, we can create the GET API as well -
const handleGet: Handler = async req => {
  const param = req.pathParams;
  if (param != "") {
    const url = await UrlSlug.findOne({slug: param})
    return Response.redirect(url.url)
  } else {
    return await UrlSlug.findAll()
  }
}
In GET APIs, we have 2 possible scenarios.
- A user could either try and fetch all the URLs added in the database.
- A user could try to navigate to the URL using a slug that is saved in the database.
For that, I'm fetching the path parameters with req.pathParams and checking if a parameter is provided.
If it is provided, I'm trying to find the database entry using the findOne method on our model UrlSlug, and redirecting to its URL.
If however no parameter is provided, I'm getting all the database entries using the findAll method on our model and returning them.
The DELETE API is relatively simple -
const handleDelete: Handler = async req => {
  const payload = await req.json()
  await UrlSlug.delete({id: payload.id})
  return "deleted " + payload.id
}
Here, we are simply expecting the id of our database entry as payload, and we are using it inside the delete() method on our model to delete the entry from our database.
Now, let's create a function that will receive and process the requests on our server's endpoint. Let's create that -
const handlers: Record<string, Handler> = {
  POST: handlePost,
  GET: handleGet,
  DELETE: handleDelete
}

export default async function chisel(req: Request, res: Response) {
  if (handlers[req.method] === undefined)
    return new Response(`Unsupported method ${req.method}`, { status: 405 })
  return handlers[req.method](req, res)
}
Here, we are creating a constant called handlers, which is going to call different functions based on the request, and then we are exporting our chisel function (any function thats exported will do) which will call the functions in the handlers based on the request method type.
Now that our APIs are sorted, let's start our backend and test them. To do that, we can navigate to the backend/ directory of our project and simply run the following command in the terminal -
npm run dev
This command starts our ChiselStrike server in development, and our API can be accessed through the /dev/url endpoint.

To Test the API, I'll create a simple POST request from POSTMAN to see if it works -
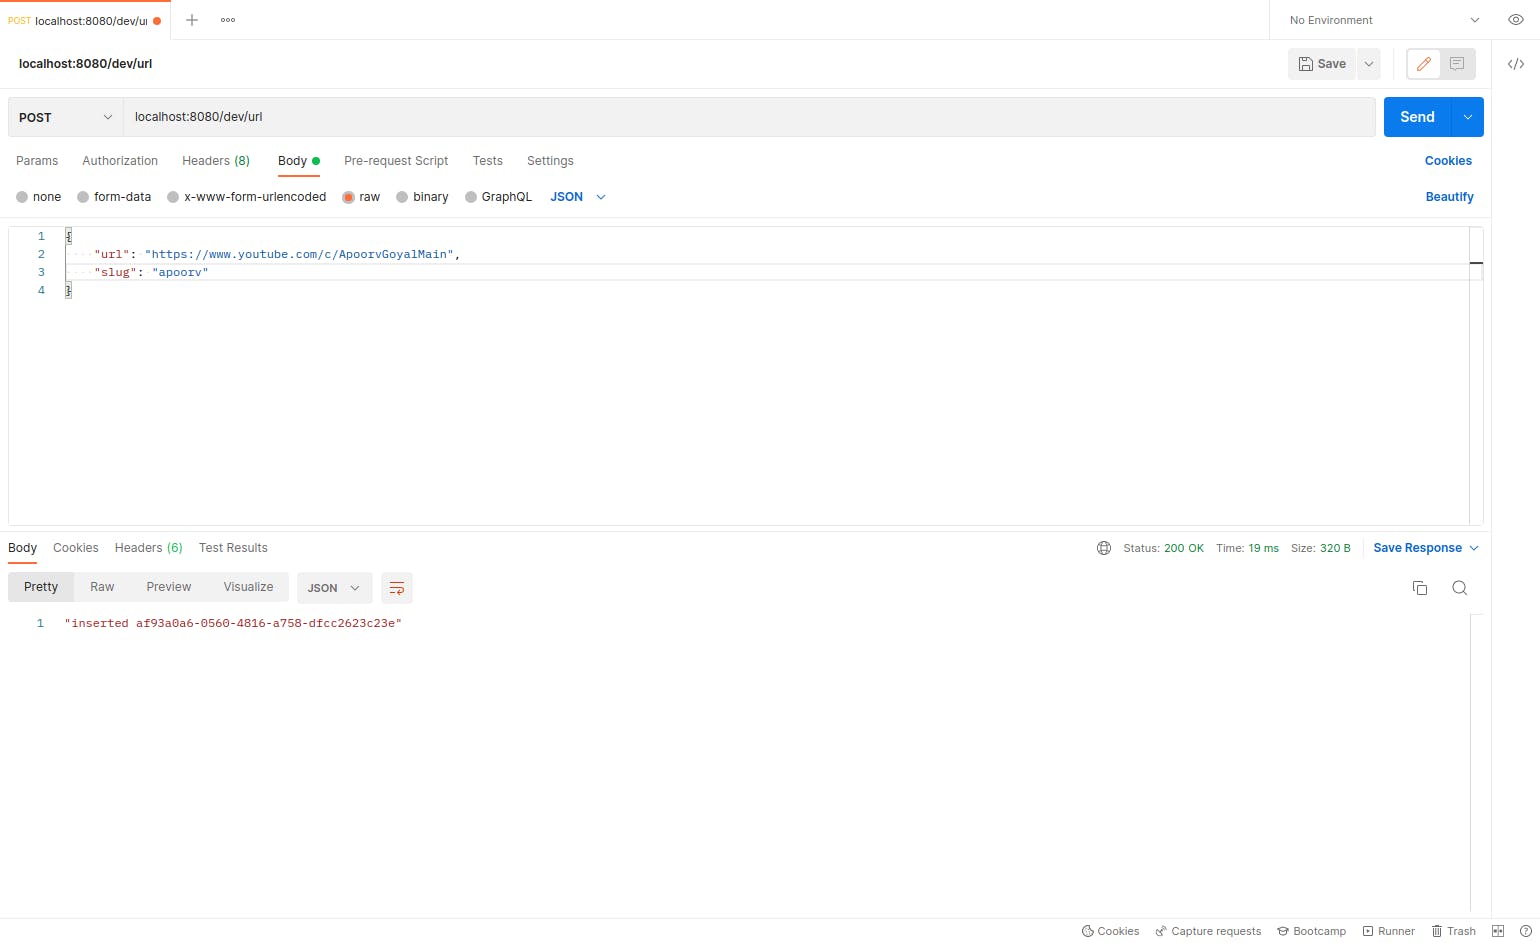
Looks to be working just fine!
Next, we can simply go to localhost:8080/dev/url in our browser to check all the URLs added -
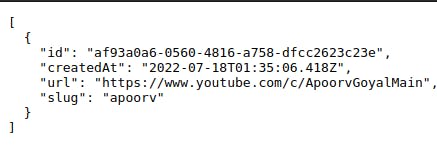
On opening /dev/url/apoorv redirects me to my YouTube channel, so our redirection works just fine, and finally testing the DELETE API -
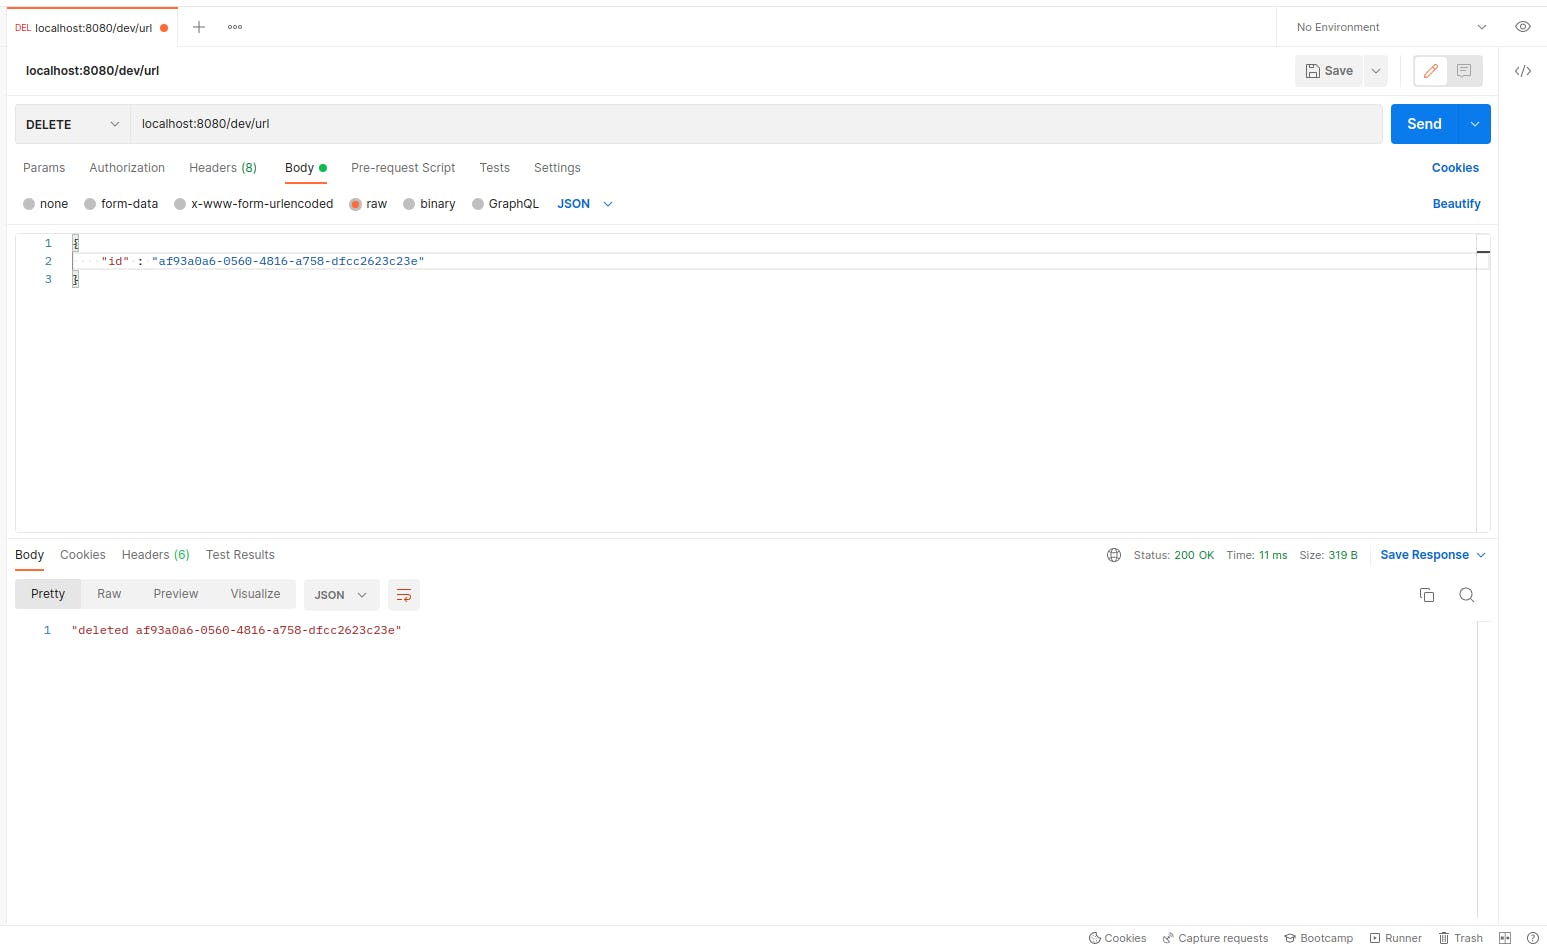
Our GET, POST and DELETE APIs work like a charm! As you would have noticed. With absolutely minimal code and next to no setup, our APIs along with the database got up and running. Talk about rapid application development now!
With our backend done, it's time to move to the frontend now!
Integrating our frontend application with ChiselStrike -
Inside our src/ directory, let's create another directory called services and inside src/services/api.js -
import axios from "axios"

const chiselStrikeApi = axios.create({
  baseURL: "http://localhost:8080/dev",
})

export default chiselStrikeApi
This way, we can simply use ChiselStrikeApi to access our APIs. Now, it's just about adding some frontend code. We can do that in src/pages/indes.js. I personally used react-bootstrap for this project but you can choose to use anything -
import React, { useState, useEffect, useCallback } from "react"
import api from "../services/api"

// Some Style Constants defined here (based on how you choose to build your frontend)

export const getUrlsFromChisel = async () => {
    try {
        const res = await api.get("url", {})
        return res.data
    } catch (error) {
        console.error(error)
    }
}

export default function IndexPage() {
    const [urls, setUrls] = useState([])
    const [newSlug, setNewSlug] = useState("")
    const [newUrl, setNewUrl] = useState("")

    useEffect(() => {
        const getUrls = async () => {
            setUrls(await getUrlsFromChisel())
        }
        getUrls()
    })

    const handleChangeNewSlug = useCallback(event => {
        setNewSlug(event.target.value)
    }, [])

    const handleChangeNewUrl = useCallback(event => {
        setNewUrl(event.target.value)
    }, [])

    const handleUrlCreation = useCallback(async () => {
        try {
            await api.post("url", {
                slug: newSlug,
                url: newUrl,
            })
            setUrls(await getUrlsFromChisel())
        } catch (error) {
          console.error(error)
        }
        setNewUrl("")
        setNewSlug("")
    }, [setUrls, newSlug, newUrl])

    const handleUrlDelete = useCallback(async (urlId) => {
        try {
            await api.delete(`url`, {
                id: urlId
            })
            setUrls(await getUrlsFromChisel())
        } catch (error) {
            console.log(error)
        }
    })

    return (
        // Your Frontend Code Here
    )
}
For reference on how I build a basic frontend for this project, you could refer here.
With this, you can simply run your frontend project with the command -
gatsby develop
You can then run your backend with -
cd backend
npm run dev
It will get your project up and running!
Integrating the two
Sometimes, it can be a hassle working on a project and repeatedly having to start both frontend and backend projects. For that, there is an additional plugin available.
In the gatsby-config.js file, inside plugins, add -
{
      resolve: `gatsby-chisel`,
      options: {
        path: `${__dirname}/backend`,
      },
}
And inside plugins/gatsby-chisel, create 2 files -
package.json
{
    "name": "gatsby-plugin-chisel",
    "version": "1.0.0",
    "description": "",
    "main": "gatsby-node.js",
    "scripts": {
      "test": "echo \"Error: no test specified\" && exit 1"
    },
    "author": "",
    "license": "ISC"
  }
gatsby-node.js
const { spawn } = require("child_process")

const consoleColorOff = "\x1b[0m"
const consoleColorWhite = "\x1b[37m"
const consoleColorRed = "\x1b[31m"
const consoleColorCyan = "\x1b[36m"

function color(color, msg) {
  return `${color}${msg}${consoleColorOff} `
}

function logNormalData(data) {
  String(data)
    .split("\n")
    .forEach(s =>
      console.log(
        color(consoleColorCyan, "ChiselStrike:"),
        color(consoleColorWhite, s)
      )
    )
}

exports.pluginOptionsSchema = ({ Joi }) => {
  return Joi.object({
    path: Joi.string().required(),
  })
}

exports.onCreateDevServer = (_, options) => {
  const chiselServer = spawn("npm", ["run", "dev"], {
    cwd: options.path,
  })

  chiselServer.stdout.on("data", data => {
    logNormalData(data)
  })

  chiselServer.stderr.on("data", data => {
    logNormalData(data)
  })

  chiselServer.on("error", error => {
    console.error(
      color(consoleColorRed, `ChiselStrike error: ${error.message}`)
    )
  })

  chiselServer.on("close", code => {
    console.log(
      color(
        consoleColorRed,
        `ChiselStrike's server process exited with code ${code}. Killing Gatsby's process soon...`
      )
    )
    // Kills Gatsby along with ChiselStrike, remove this if ChiselStrike needs to fail silently
    process.exit(code ?? 1)
  })
}
As of now, this plugin cannot be installed through npm, but it will be available soon!
Conclusion
ChiselStrike is one of the easiest frameworks to work with. I've created backend in a lot of frameworks, however, the ease with which you can get your databases up and running without doing much or worrying about data compliance is a big factor for me as a developer. On top of that, creating APIs and endpoints with it is really easy, and its structured filesystem keeps things neat.
You can easily create production-ready prototypes through this framework and focus on your business side more, rather than being stuck with development-related issues.
Also, their team is incredible! While building this application, I got stuck on a few problems and their team was always available to help me out in Discord (join here). One of their co-founders - Pekka - even went the extra mile to help me with my code by making a pull request in my repository. Nothing significant in the PR, but this small move tells a lot about their team.